Initial Repairs
I bought a Mercruiser service manual and started with the impeller replacement. This went fairly easily despite the outdrive being a piece of
machinery with which I was totally unfamiliar. I found that the Mercruiser
manual is unlike some of the car service manuals that I've used, in that it
doesn't provide much in the way of theory of operation. It tells you how the
parts go together, but skims over the why of it. I spent a lot of time studying
the diagrams, trying to figure out how things work. I also found a lot of
information on the Internet, including a Usenet forum called rec.boats which is
inhabited by a colorful group of characters who are very generous with advice.
Some of that advice has actually proven very helpful.
 On
a "pre-alpha" Mercruiser outdrive like mine, to get to the impeller you take out some fasteners that hold the lower half of the drive to the top
half and then you take the lower half off. The water pump is on top of the lower
half, driven by the drive shaft that passes between the two halves. The impeller
is a star shaped gadget with rubber fins that move the water through the pump.
The impeller that I removed from my drive had been sitting so long that each fin
had a neat 90 degree bend in the end. Instead of a star, it looked like a six
armed swastika.
On
a "pre-alpha" Mercruiser outdrive like mine, to get to the impeller you take out some fasteners that hold the lower half of the drive to the top
half and then you take the lower half off. The water pump is on top of the lower
half, driven by the drive shaft that passes between the two halves. The impeller
is a star shaped gadget with rubber fins that move the water through the pump.
The impeller that I removed from my drive had been sitting so long that each fin
had a neat 90 degree bend in the end. Instead of a star, it looked like a six
armed swastika.
The gear shifting mechanism for my drive is located in the lower unit, also.
Newer types of outdrives have a separate transmission in between the engine and
the drive, which simplifies the outdrive portion of things quite a bit. Mine
works by sliding a couple of gears back and forth down there in the lower end so
that either the forward gear or the reverse gear engages another gear on the end
of the vertical driveshaft. That is, unless you're in neutral, in which case
neither is engaged. This means that everything in the outdrive, with the
exception of the propeller shaft, is turning any time the engine is running,
even in neutral. The shifting is accomplished by turning a shaft that sticks up
through the front part of the lower unit, which turns a crank down in the bottom
of the thing and slides the gears back and forth. When the drive is in the
trailering position, as mine had been for five years, the top of the shift shaft
is at the lowest point of the unsealed parts of the drive and mine had collected
a generous amount of mud and crud in that area. There's a passage in front of
the shift shaft that leads down to a little weep hole for drainage. That passage
was packed with mud that had dried like concrete. I spent several hours cleaning
those parts up. You'll hear more about them later.
 While working on the
outdrive, I noticed that the trim position indicator on
my dashboard didn't indicate the position of the drive when I moved it up and
down with its hydraulic actuators. The sensor for this indicator is a rotary
potentiometer mounted on the pivot point of the drive. I took the sensor off and
couldn't find anything wrong with it until I noticed cracks in the wires
connected to it. I pulled the wire out to have a look and chunks of insulation
fell off. Further examination revealed bare wire exposed for much of the wires'
length. There's a limit switch on the other side of the drive and its wires were
in similar condition.
While working on the
outdrive, I noticed that the trim position indicator on
my dashboard didn't indicate the position of the drive when I moved it up and
down with its hydraulic actuators. The sensor for this indicator is a rotary
potentiometer mounted on the pivot point of the drive. I took the sensor off and
couldn't find anything wrong with it until I noticed cracks in the wires
connected to it. I pulled the wire out to have a look and chunks of insulation
fell off. Further examination revealed bare wire exposed for much of the wires'
length. There's a limit switch on the other side of the drive and its wires were
in similar condition.
I looked around the engine compartment to see if any other wires were that
badly off. None were. All but these extremely difficult to replace wires were in
fine shape.
To get into the boat, the wires that needed to be replaced have to pass
through the transom. That's the part in the back of the boat, or stern as we
seamen like to call it, where the engine is attached. Each pair of wires, one
set for the position sensor and another for the limit switch, has half of a
rubber stopper molded onto it. The two halves go together to make one whole
stopper which seals the hole where the wires pass through to the inside of the
boat. They're held into their hole by a metal plate with two bolts through it.
That plate is behind the bell housing at the top of the outdrive and meant to be
installed when most of the drive is not present.
Not wanting to take out the entire drive, I rigged up a Rube Goldberg series
of extensions and u-joints in between a ratchet and socket and with incredible
difficulty I removed the bolts. Getting them back was going to be even harder. A
new set of wires was absurdly expensive for some reason, so I decided to see if
I could salvage the stopper halves and rebuild the harnesses with some generic
wire. The stopper halves came off easily, thanks in part to the deteriorated
insulation on the wires. I initially thought of using silicone wire, available
at the local hobby shop for use in remote controlled cars, for my replacement. I
couldn't find any of the right size, though and it's probably just as well since
silicone insulation doesn't have the best abrasion resistance. I eventually
found some TPE (thermoplastic elastomer) insulated wire at Radio Shack to use.
TPE is strong, impervious to most oils and extremely flexible. Best of all it
was available right then and there in the size I needed. I rebuilt the wiring
harnesses, put them on the boat and started trying to figure out how to get the
bolts back in.
Getting the bolts started in their threads was going to be the problem. Once
started I could drive them home with the Rube Goldberg contraption that I'd used
to take them out. After a little trial and lots of error, I formed a bolt holder
from a piece of 1/16 inch music wire that would hold the bolts in front of their
holes up behind the bell housing. Then I started them into their threads with a
very long hemostat that I'd found at Harbor Freight Tools. It was tedious, but
it worked.
The starter problem turned out to be the simplest one to fix. There's a
switch on the back of the throttle/gear shift lever that won't let the starter
work if the gear shift is engaged. The switch was stuck in the engaged position
and just needed to be freed up. While I was working with electrical wiring, I
removed the trolling motor, since I didn't have any immediate plans to use it
and it was taking up a large chunk of the seating space up front. I also removed
the live well. The well had a minor design flaw, in that there was no way to
drain the water from it, which was making it into a mosquito hatchery. I also
undid some of the unconventional wiring modifications that had been done by the
previous owner. He seems to have been fond of large twist lock AC connectors for
DC wiring.
Next up was the carburetor. I bought a rebuild kit, removed the carb and
started disassembling. I was amazed that Ron had coerced the engine to idle
after seeing the half inch deep layer of sludge in the bottom of the float bowl.
The accelerator pump passages were completely clogged and the metering jets were
very nearly so. More hours were spent cleaning the carburetor.
After putting the carburetor back on, I replaced the breaker points (no electronic
ignition here), cleaned up the distributor cap and put in new spark plugs. I
bought one of those pumps that you stick down in the dipstick tube to change the
oil, but it wouldn't fit my tube. I got out the trusty dish pan that I use for
draining car oil and found that it would fit under the engine nicely. Getting it
out once it was full of oil was going to be difficult but I'd deal with that
when the time came. I ended up removing the battery and shoehorning the pan of
oil out through the battery compartment.
I was finally ready to see if any of my repairs were successful. In order to
test run the engine on dry land, I bought a set of ear muffs. They're these
suction cups with a garden hose fitting that you put on the water intake of your
outdrive to make it think it's in water.
I hooked up the hose and got everything set, knocked on wood, crossed my
fingers, and turned the key. It started immediately with a nice smooth rumble.
Orange rusty water was streaming out the back, but after a few minutes it ran
clear. The temperature gauge climbed to mid range and stabilized. Oil pressure
and charging current looked good. I shut it down and looked the engine over. I
checked the oil to make sure I wasn't getting water into the crankcase.
Everything looked good; there were no leaks or fires or any other problem
indicators. I started it up again and advanced the throttle. It revved up
nicely. I played with the throttle a bit, trying not to over rev it since there
was no load on the engine. I put it in gear and the propeller shaft obediently
rotated in the appropriate direction. Back to reverse and all was good there,
too.
 I called my brother in law, Jack, the following day, a Thursday, and asked if
he'd come help me launch the boat on Saturday. Jack is a retired Coast Guardsman
and knows a thing or two about boating. He said he'd be glad to help. That evening I hitched the boat to my
truck for the first time and towed it a couple of miles to a gas station where I
put some gas in the boat's tank. The gas gauge started at about half and
I stopped pumping gas when it read full, but I doubted its accuracy. My little
truck handled the boat well enough, but if I'm going to do a lot of boat moving
I'll probably need a bigger tow vehicle. I don't know how much the boat and
trailer weigh (no documentation came with it) but I'm pretty sure it's at or
above my truck's towing capacity.
I called my brother in law, Jack, the following day, a Thursday, and asked if
he'd come help me launch the boat on Saturday. Jack is a retired Coast Guardsman
and knows a thing or two about boating. He said he'd be glad to help. That evening I hitched the boat to my
truck for the first time and towed it a couple of miles to a gas station where I
put some gas in the boat's tank. The gas gauge started at about half and
I stopped pumping gas when it read full, but I doubted its accuracy. My little
truck handled the boat well enough, but if I'm going to do a lot of boat moving
I'll probably need a bigger tow vehicle. I don't know how much the boat and
trailer weigh (no documentation came with it) but I'm pretty sure it's at or
above my truck's towing capacity.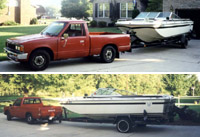
Laura called Hidden Cove Marina on Friday to see if they'd let us use their
ramp again. I would have been willing to pay a reasonable fee, if that's what
they wanted. When she finally got someone on the phone he said no way; we
couldn't use their ramp unless we rented a slip. There's a public ramp across
the river, about ten miles from home, so I decided we'd use that.
Next: Strike Two
Index